User Management and Reporting
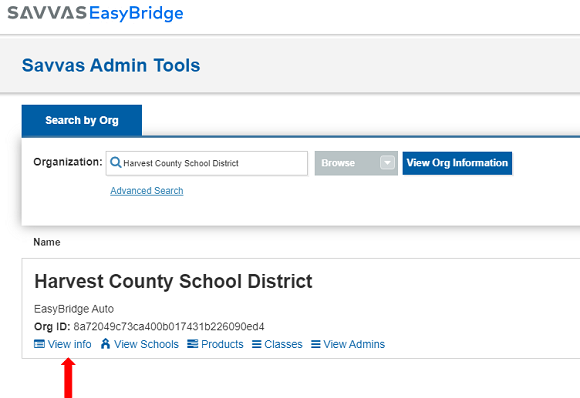
Access Savvas Admin Tools via the User Management and Reporting section. Click the blue Savvas Admin Tools to be taken to a new window. Here, you can search for a specific organization or user to view information on products, licenses, classes, users, and platform configurations.
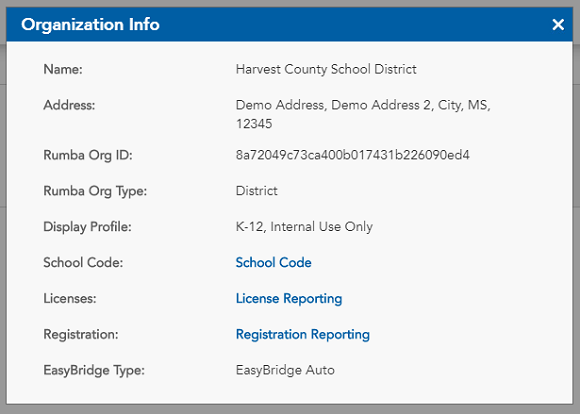
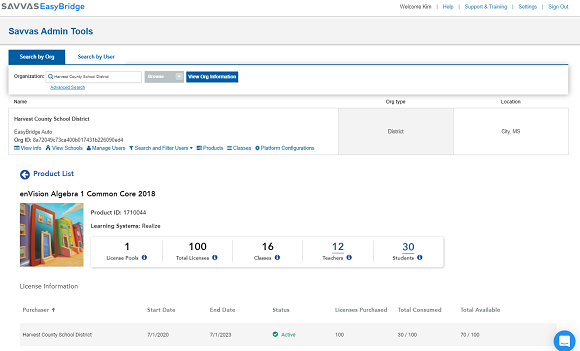
Information about a specific organization is found in the View info section of the Admin Tools. Confirm the full name listed for Savvas, the official address, Rumba Org ID, Rumba Org Type, and Display Profile, and EasyBridge type.
Access the School Web portal to view school codes and registration reporting information. While license reporting information is also available through the School Web Portal, it is recommended to use the license information from EasyBridge. This is the more up to date license information for a school or district.
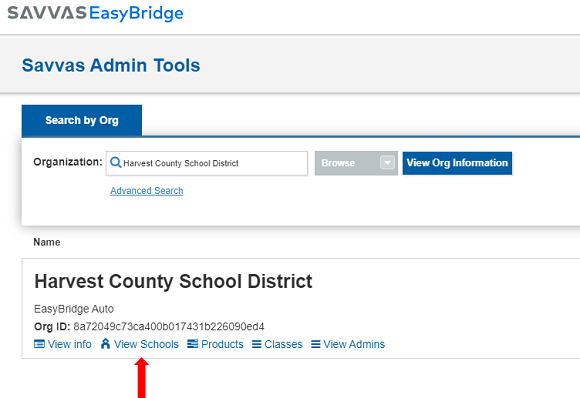
A complete list of school can be found on the View Schools page in the Savvas Admin Tools.
View the school names, addresses, roster sources, and if teacher self-registration and class code rostering are enabled for the organization. This is also where you can find if Google Classroom linking is enabled, and the ability to change the setting.
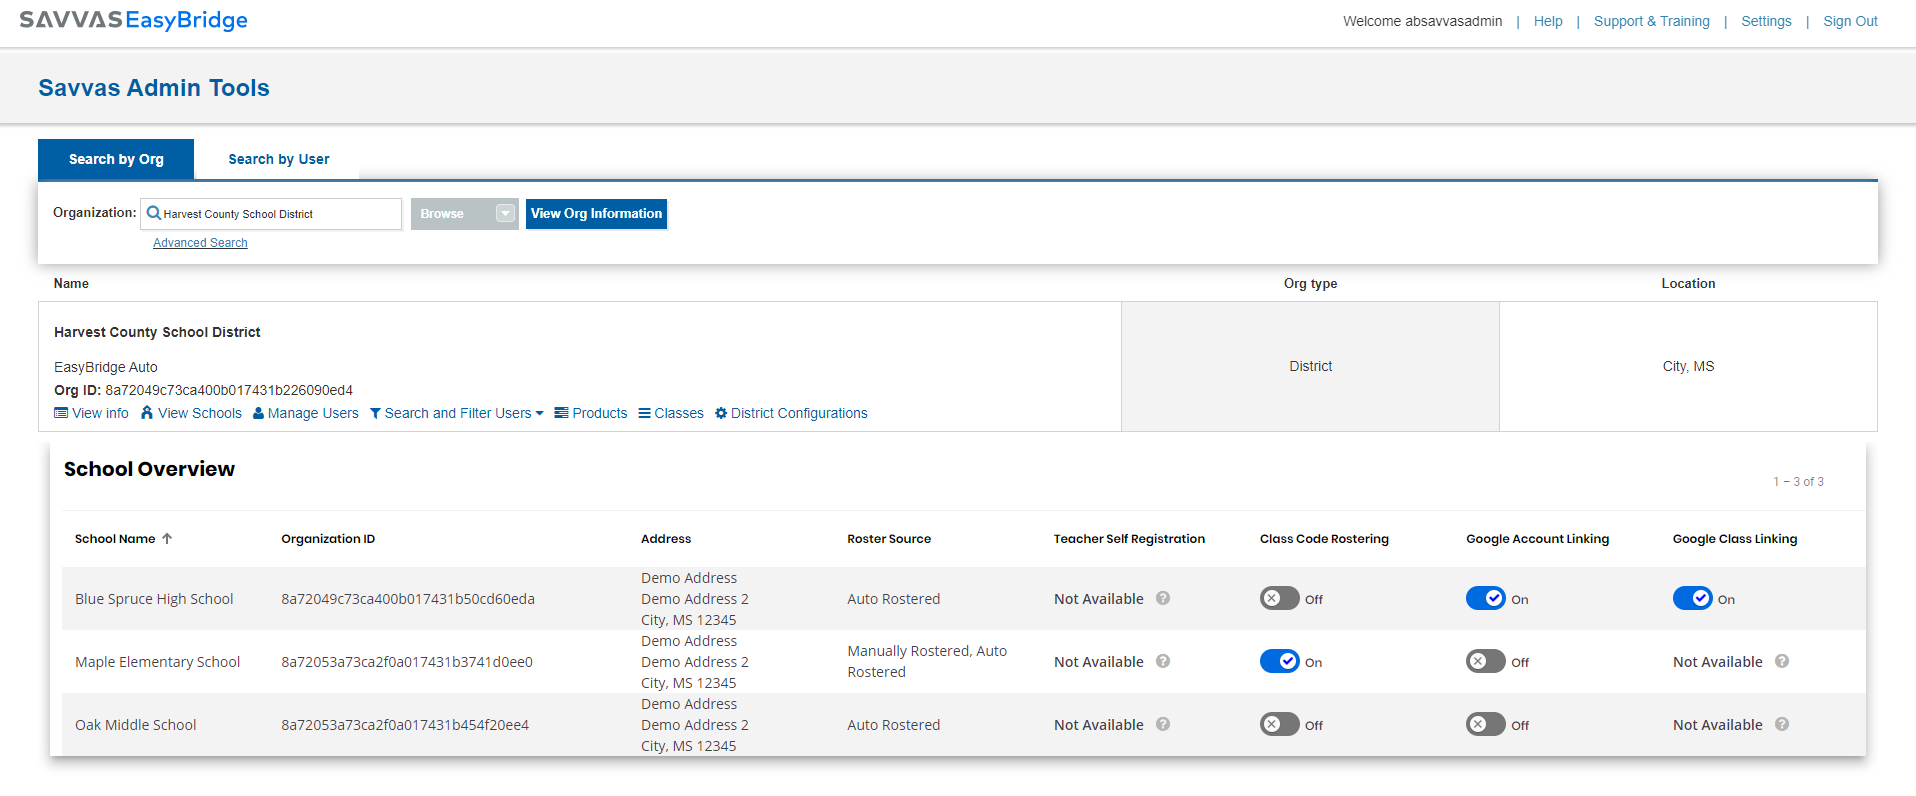
To quickly filter and view information about a specific user, go to the Manage Users link after searching for an organization. This view is identical to what customer administrators have, but with more options depending on your permissions as a Savvas administrator.
Teachers Tab
Teachers in auto-rostered classes should continue to be managed through the automated processes already in place, and will see a different screen for the Teachers tab on EasyBridge. Below are expected administrator views of the Teachers tab on the Users page depending on the district setup.
Administrators in schools or districts using mixed mode can manage teachers in manually rostered classes directly from EasyBridge.
To learn more about how to manage teachers and students for these manually rostered classes, click the links below to go to the EasyBridge Basic help topic, located in a different help system from the one you are currently using.
Student Tab
Administrators in schools or districts using mixed mode can manage students in manually rostered classes directly from EasyBridge. It is important to note that students in auto-rostered classes should continue to be managed through the automated processes already in place.

To add or update an individual student, click the blue Manage button under Manage a Student. A new browser automatically opens and you are logged into Savvas EasyBridge.
To register many students from multiple schools at one time, click the Advanced Upload button. A new browser automatically opens and you are logged into Savvas EasyBridge.
To learn more about what student information can be managed directly in EasyBridge, go to the help links below.
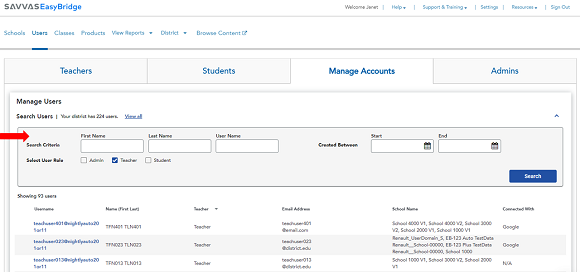
Manage Account Tab
EasyBridge Administrators can view all users on the Manage Accounts tab. This tab is located on the Users page. Search by name, username, user role, or account create date range to quickly find a specific or select group of users.
- Login to EasyBridge.
- Click the Users page in the top navigation menu.
- Navigate to the Manage Accounts tab.
- Enter Search Criteria to quickly narrow the list of users returned.

Savvas administrators can Delete Users, Suspend Users, and Unsuspend Users from this screen.
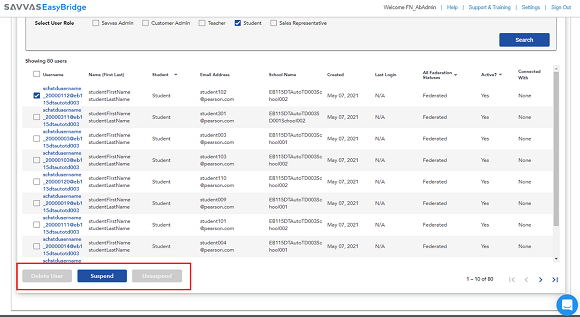
Click the username to go to the User Details page.
Connected Accounts
Administrators can quickly identify teachers and students who have linked their district accounts with Google Classroom and/or LTI-A. Enter criteria retrieve information for an individual or a group of users. Results display username, name, role, email address, school name and connected with. The Connected With column is populated with Google or LTI-A when accounts are linked, and N/A when there there is no connection.
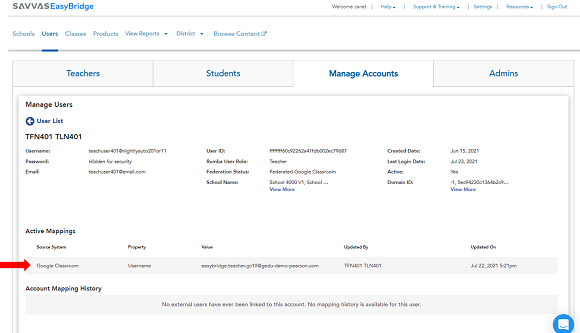
User Details
Detailed information for the user selected is found on this page, ranging from username to last login date. If Google Classroom linking is enabled for your district, you can find Active Mappings along with any Account Mapping History on this page. To verify which schools allow Google Linking, go to the School Overview page.
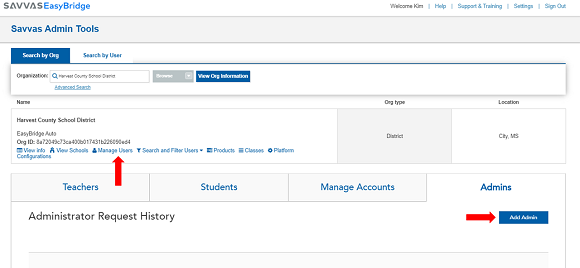
Admins Tab
Existing EasyBridge Plus administrators can add and manage other administrators via EasyBridge. School administrators can add new administrators for their school only, while district administrators can add administrators for multiple schools as well as the district. Administrator accounts can be deactivated if an individual leaves the school. The same account can be reactivated should the individual return to the school or district. All administrators with active accounts are displayed in the Administrator Accounts list on the Users page. It is best practice to periodically monitor who continues to have administrator access. Review the steps below to add, edit, deactivate or reactivate an administrator account.
Multiple administrator accounts cannot be associated to the same email in the same school or district. If an administrator requires more than one account, they need to be created in different schools. To add an administrator, follow the steps below:
- Login to SavvasEasyBridge.
- Go to the Manage Users page and navigate to the Admins tab.

- Click the Add Admin button.

-
Enter all information including first name, last name, district approved email, username, and organization (school or district).
Note: Changes take place immediately, but may take up to 10 minutes to display in the Administrator Account list.
- Click Add to save changes. An email will be sent directly to the newly added administrator. Additionally, the new administrator will appear on the Administrator Accounts list on EasyBridge (after 10 minutes).

To make changes to administrator accounts on EasyBridge, follow the steps below:
- Login to SavvasEasyBridge.
- Go to the Users page.
- Click View on the row for the administrator needing changes.
- Click Edit.
-
Make changes to the first name, last name, district approved email, and/or organization. The username cannot be changed after it has been created.
-
Click Save to keep changes.
Note: Changes are immediate when saved, but may take up to 10 minutes to display on EasyBridge.
Administrator accounts can be deactivated on EasyBridge. Follow the steps below to deactivate an administrator account:
- Login to SavvasEasyBridge.
- Go to the Users page.
- Click View on the row for the administrator account you would like to deactivate.
- Click Active in the Status area. This will display the following message:

- Click Deactivate to complete the process and disable the administrator account.
- Follow the same process to Reactivate an administrator account.

To more quickly find a class in your school or district, use the Search classes feature on the Classes page. Select a roster source, and then filter classes by class name, primary teacher, and/or school name (for district administrators only). Follow the steps below to search for classes in a school or district.

Steps to filter classes
- Select a roster source by checking the box to the left of the source needed.
- Select a value to filter in the first drop down box. Classes can be filtered by class name, class code, SIS Source ID, Subject, Primary Teacher, School Name, Grade, Class Type, and/or Course Name.
- Select a modifier -contains the text, does not contain the text, equals any value, is not equal to any value depending on the value you have selected.
- Enter a value in the text box or select an option from the drop down menu that appears to specify the class or classes to filter.
- To add more filters, click + Add filter.
- To remove a filter, click the X to the right of the text box for the filter you would like to remove.
Note: You can add additional filters by checking the boxes for the following:
- Only Show Linked Google Classes (used to filter by linked classes) - this box can only be checked in conjunction with Auto Rostered classes.
- Only Show NYR Opted-Out Classes
- Show Deleted Classes, and/or Show Hidden Classes.
- Click the blue Search button.

The products page provides license usage and license pool details, as well as the ability to associate more classes to products, or more products to classes.

View a complete list of products associated to a district and/or school.
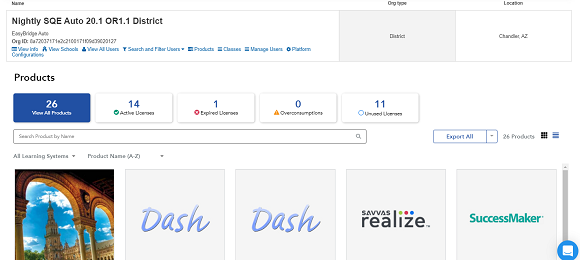
Select a product title to go to the product details page. Here you will see the specific classes associated with the product selected. You can export the list of classes, associate more classes to the selected product, remove specific classes, and access the class details page.
Click the Associate more classes button, or click the class name to go to the class details page.
The classes page provides a complete list of classes for the term in the district and schools. Classes appear in alphabetical order and include the class name, teacher, grade level, school, subject and roster source.
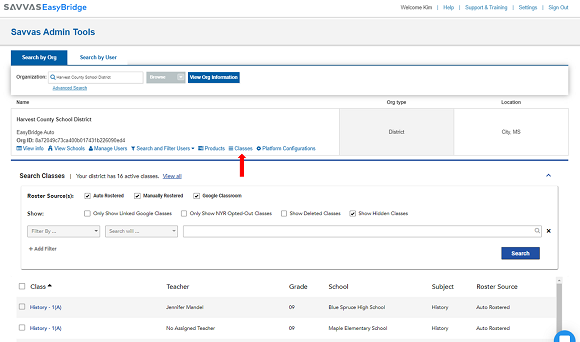
Use the Search Classes feature to filter by roster source, or filter by another key word to quickly find a specific class. Select the class name to navigate to the class details page.
To learn more about Google Classroom Matching and functionality as a Savvas Admin, see more on the Google Classroom Matching help.
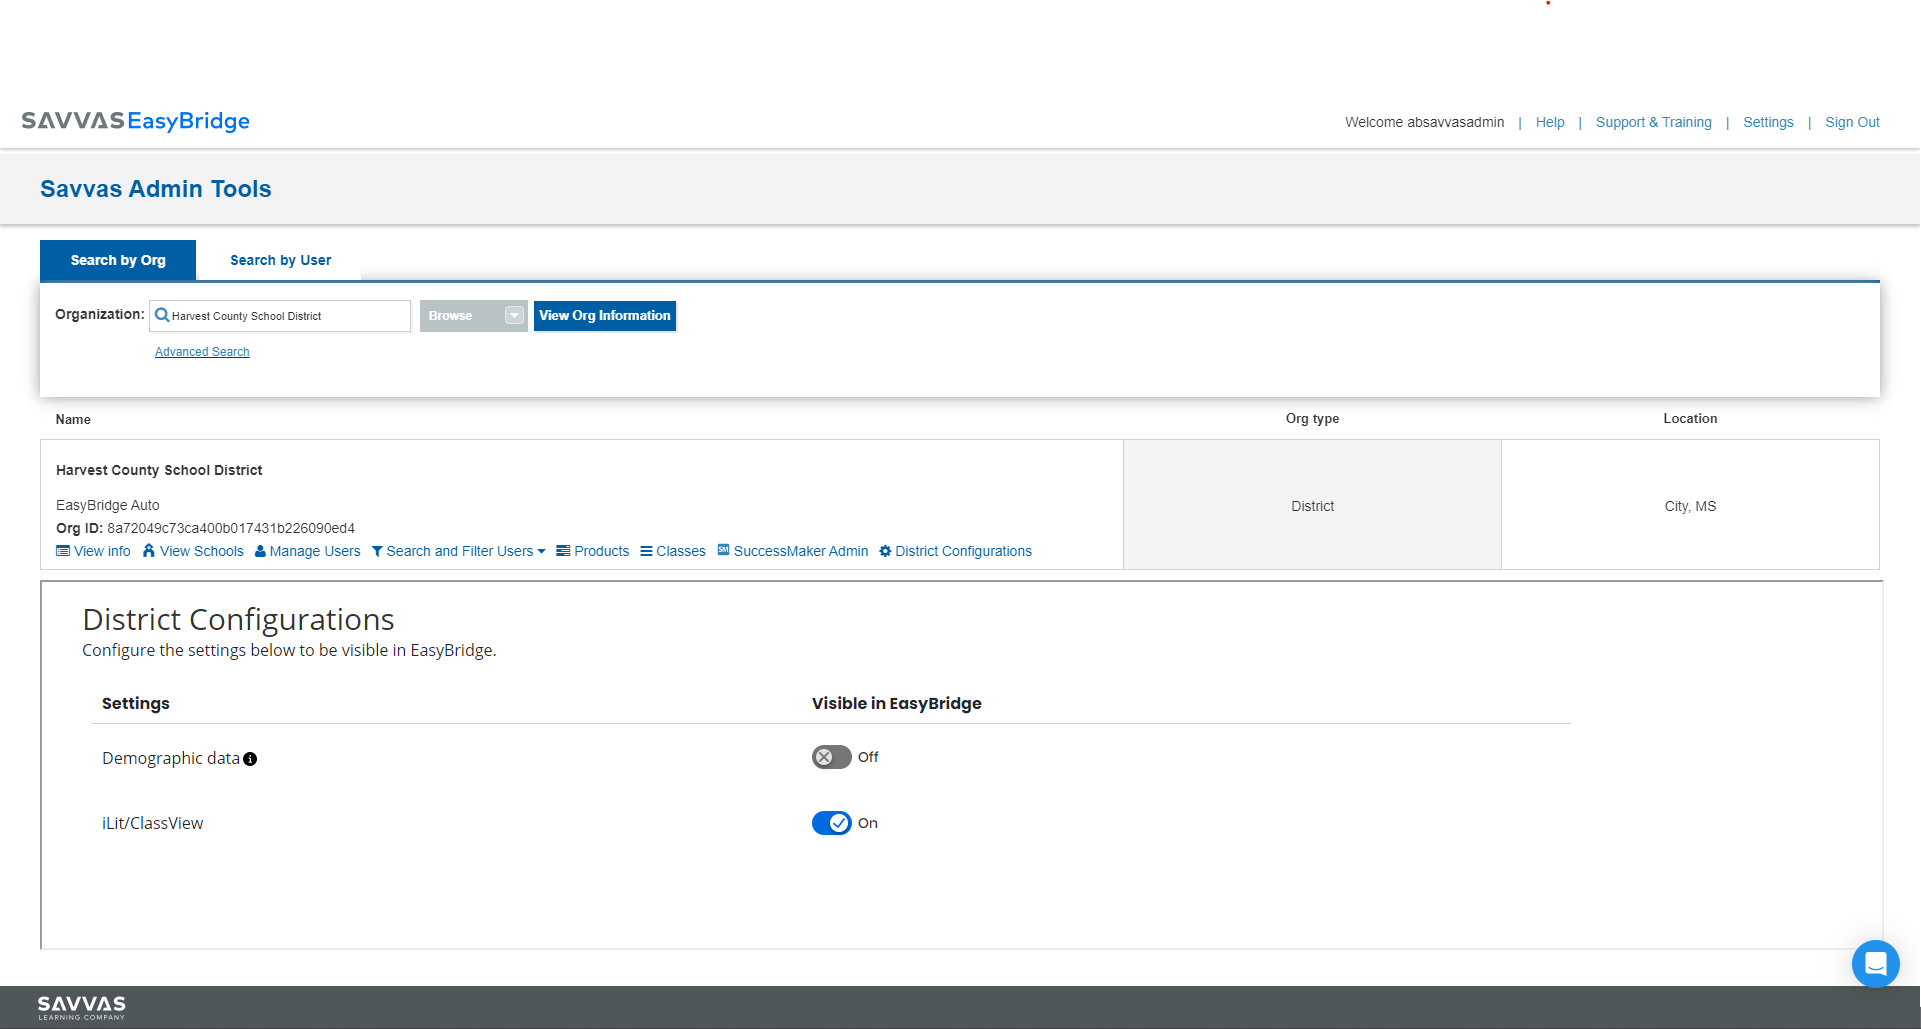
The District Configurations page provides a way for Savvas Admins to control whether or not iLit and Demographic data appear in EasyBridge. Use the toggle to enable or disable your selection.
Student Demographic Data contains personally identifiable information (PII) and you should only enable it with permission by the district. This data will be visible in the student details and can also be imported and exported by school/district level admins.
In this section, you will find links to specific topics related to Google Classroom that provide steps and internal information for a Savvas administrators.