Overview of Classes
Select Classes on the top menu bar to create classes and groups and add students to them. If you have set up Google Classroom™ integration, you can also import classes of students from Google Classroom™ to Realize.
Once you have classes and students, you can create and give your students assignments from content in your programs A program is a product your school or district has purchased. or from content you've uploaded. Your assignments can be targeted to classes, to groups or to individual students. You can also assign additional advanced or remedial activities.
You can assign tests and assessments that are included in your program or you can build a test with a mixture of program content, content found in your keyword searches, and your own content. After you assign content to your classes and groups, you can track their progress and success on assignments.
As soon as you place students in classes or groups, they will have access to their assignments.
You can hover your cursor over the Classes menu from anywhere in the Realize application to display your classes list.
You can use the search at the top of the Classes menu to find specific classes by name.
Select View Inactive Classes to display a page with classes you have previously hidden or classes that do not have programs. You can unhide classes or add programs from this page.
- Learn how to create classes.
- Create groups that contain students from one or more of your classes.
- You can add or remove students in your classes at any time.
- You can manage your class profile as well as add and remove programs for your classes in class settings.
- You can create assignments and assign them to your classes, groups or individual students.
- You can edit assignments you've already created for each class.
- You can have a discussion with your students by posting comments to which they can respond.
Setting up a class
Teachers and students who previously logged into Savvas EasyBridge or another rostering service can now access Savvas Realize directly for all their class management and rostering requirements. This update will not impact users who roster classes via their LMS.
Get started by setting up your first class.
-
In Realize, select Set up a class from the Home page or Classes page.
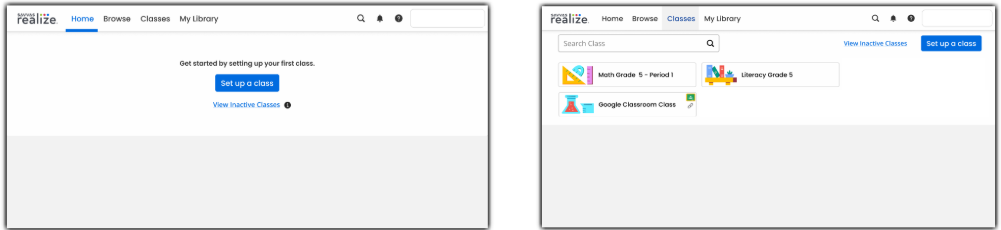
Select View Inactive Classes to view a list of inactive classes.
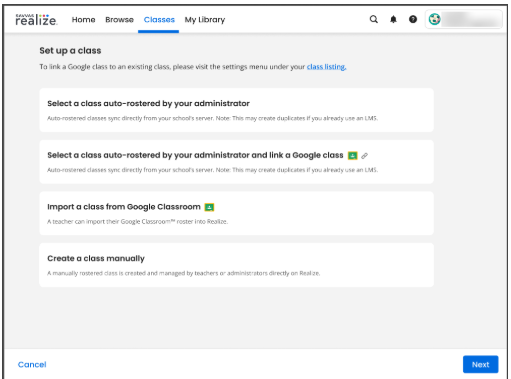
The Set up a class window appears.
-
From the displayed options, select the rostering option (the options are displayed as per your district settings).
To link a Google class to an existing class, visit the settings menu under your class listing.
-
Select a class auto-rostered by your administrator:For teachers who used Realize Admin for auto-rostering.
The Select a class auto-rostered by your administrator window appears.
-
From the drop down list, under Choose a Realize Class, select the Class.
-
-
Select a class auto-rostered by your administrator and link a Google class
The Select a class auto-rostered by your administrator and link a Google class window appears.
-
From the drop down list, under Choose a Realize Class, select the Class.
-
From the drop down list, under Choose a Google Class, select the Class.
-
-
Import a class from Google Classroom
This option will only be visible if you are currently using Google Classroom.
The Import a class from Google Classroom window appears.
-
From the drop down list, under Choose a Google Class, select the Class.
-
From the drop down list, under School, select the School.
-
-
Create a class manually in the Class set up page: Teachers and Administrators who are used to log into Realize.
-
-
Select the Next button at the bottom of the page.
The Class setting page appears.
-
Complete/modify the necessary changes in the Class set up page and select the Done button at the bottom right to append the changes and complete the class setting up process.